Approach early stage design with greater insight and intelligence with our conceptual design workflows integrating FormIt, InfraWorks, Insight and Dynamo.
See how FormIt allows you to visualize and clarify intended design outcomes in the early stages of a project. Refine your design to better fit the functional requirements of your project site and develop meaningful project data in a short amount of time to better communicate and support your design intent.
This webinar will cover:
How to model site conditions using geo-data from InfraWorks
Modeling sun and shadow, solar analysis, and energy performance for early stage design concepts with Insight
Optimizing form to function with Dynamo
Better interoperability with Dynamo and Revit (2021 releases)
Join our AEC Collection Essentials Webinar Series. With each webinar, we feature a multiproduct workflow enabled by a comprehensive set of tools available in the Architecture, Engineering & Construction Collection. We’ll show business benefits and in-depth workflow demos, providing an overview of the latest updates where applicable.
Wish you could automate repetitive tasks and save time during the coordination phase of every project?
Join technical specialist Stephen Bessette as he unveils how to pair Navisworks and BIM 360 Model Coordination to make the model coordination process easier than ever — saving you hours of time on every project.
You won’t want to miss this one!
In this 45-minute webinar, we’ll cover:
Automatically detect and group clashes
Easily access your Project Files for automated clash detection
Provide all project stakeholders with real-time views on outstanding issues
And much more!
45 minutes | On-demand
Stephen Bessette Sr. Technical Specialist, Construction
Join Autodesk Technical Specialists as they guide you from project setup into basic workflows supported by BIM 360 Design. They will cover topics like how to set up your teams and folders, initiate Revit Cloud Worksharing, publish from Revit, exchange models with other teams, and use powerful change visualization tools to compare model versions.
This webinar will cover:
Introduction to BIM 360 Design collaboration for Revit
Robotech also offers a comprehensive online training and support program for BIM 360 products. Please contact our team at 201-792-6300 or by email to [email protected].
Enjoy the Webinar!
The Team @ Robotech Robotech CAD Solutions Hoboken, NJ 07030 Office 201-792-6300 www.robotechcad.com
Generative Design in Revit is a new feature that brings the scale, speed, and precision of algorithmic problem-solving todesign decision-making.
What if you could explore more design alternatives in fewer steps? What if you could rank, filter, sort, and select based on parameters and constraints that you and your teams define? What if you could focus on the viable alternatives and filter out the noise?
Now you can.
With this new featureyou can generate and explore more options directly in Revit—helping you back good design intuition withdata, run more rigorous experiments,and satisfy clients and project teams through more informed decision-making.
We know architects are experts in the art of tradeoffs and science of impacts. They recognize that every decision has a knock-on effect, and they’reexperts in finding a balance between intuition and information.They translatecompeting project goals into satisfying solutions for clients and design teams alike.
Generative Design in Revit works to bring more clarity to the design critique. It answers the question–how do we decide which option is the best?–by offeringflexible ways to test, optimize, and validate design optionswith data.
Generative Design in Revithelpsproject teamsquickly devise,test, adjust, and iterate design studies. It is a powerful technique, as it produces many options; it is also precise in that it provides the ability to filter out noise and focus only on those alternatives that best meet the design goals.To explore results, the generative design capability offers scatter and point coordinate results managers, so you can adjust parameters with the simplicity of sliders orcompare different clusters of results. Dial in on balance across all design factors, or optimize for a single factor, and bring to your team and client meetings thedepth, breadth, and rigor of data well done.
How to get started.Three things to try:
1. Start with thesample studies available in Revit 2021.
Generative Design in Revit 2021 is available to AEC Collection subscribers and ships with 3 design studies common to commercial build programs.
Three Box Massing:Vary the heights and relative positions of three mass volumes to study their visual impact while also calculating surface areas and volumes.
Workspace Layout: Create desk configurations in a room, taking into account doors, windows, and columns. Calculate distances to exits, views to the outside, and more.
Optimize Window Views:Generate viewpointswithin the model andcalculate scores for the quality of views to the outside from each of these points.
You can launch these studies directly from your model in any view, by clicking on the Generative Design buttonon the Manage tab in the ribbon. Start by selecting the type of study and defining the goals. Are you trying to fit more desks in an open office floorplan, or would you prefer to optimize placement for the best views? Are you looking tofind the highest floor area ratio on a tight site, or perhaps concerned with meeting a height restriction? Use the interface to assign weights to the variables you want to study. Specify and constrain the number of design alternatives you wish to create and tell Revit how it should help you rank them. Then run your study in the background and keep working in your model.
2. Explore and visualize design alternatives.
Generative Design in Revit will return results for your study, helping you visualize a range of options. Explore the alternatives via 2D lists and interactive 3D thumbnails, and use the responsive results coordinate graph to sort, select, and filter…all in a few clicks of the mouse. Chart alternatives in a scatterplot to identify clusters of options with common characteristics.
Narrow in on a preferred set of outcomes or run the study anew with revised criteria to see the impacts asyour design priorities shift. When you decide on the best solution, click Create Revit Elements and populate your model with the chosen alternative. Use Generative Design in Revit to smartly dial-in approaches that find a happy medium between all the factors you try to balance or choose the option that best optimizes a single factor – like the most daylight or the slimmest building profile. Use Generative Design in Revit as a design assistant, a way to gather data quickly to help you make more informed decisions.
3. Build custom studies in Dynamo.
For Dynamo users, Generative Design in Revit offers a customizable framework for using the power of algorithms to uncover what’s possible. Use the Dynamo visual programming environment to connect different elements of your Revit model, and create custom design studies.
Ready to get started?
Generative Design in Revit is a new feature now available exclusively to subscribers of the AEC Collection with Revit 2021.
In Revit 2021 we made a significant change to the behavior of MEP elements regarding worksharing. This was done in order to help improve the worksharing experience, to better enable collaboration amongst stakeholders, and to provide a more consistent experience.
The changes address three types of issues that have been reported with increasing frequency, as more users use Revit for more parts of their workflow, and are collaborating more with others using BIM 360 Design for cloud worksharing.
For the most part, these changes should be transparent to your use of Revit, however, we are providing this info for those of you that support other users and may need to be aware of the details.
Model Opening Error Message
The first type of issue manifested itself while users attempted to open models. Users would receive the error message: “Can’t edit the element until “<username>” resaves the element to central and relinquishes it and you Reload Latest.” This was mostly reported related to wires, but the issue could also be reproduced with conduit, cable tray, pipes, and duct (for design as well as fabrication).
Circular Syncing Error Message
The second type of issue had the same error message, but reproducing it was far trickier. Through a certain sequence of events modifying various interconnected elements, users could end up in a situation where there could be a circular chain of syncing dependency, e.g., UserA is told UserB needs to save an element, and UserB is told UserA needs to save the element… requiring both to quit their session, potentially losing work.
The first two issues have the same root cause, namely, that unlike other element types, MEP elements modified as a result of a computed change would be checked out. What does that mean?
By way of a simple example, consider the set of walls below. If a user modifies the indicated wall by moving it ‘up’ (e.g., plan north), the walls that connect into it adjust accordingly, maintaining connectivity. Using worksharing display status reveals with green shading that the only checked out element is the element directly moved by the user. This is a result of Revit (not the user) computing the change necessary required to maintain the wall join condition.
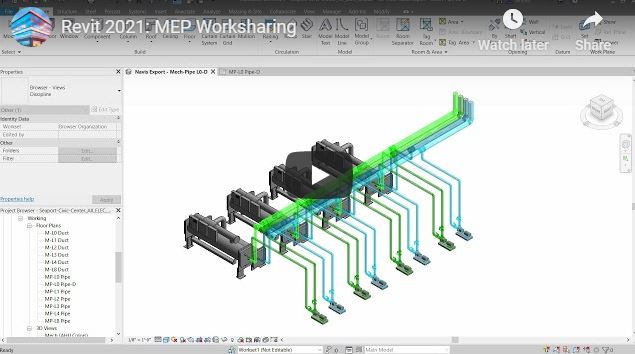
Now, compare this to what happens to MEP elements in a similar situation. In this case, a single duct is modified by the user to move the run of elements in the north direction. As a result, multiple elements are updated based on changes computed by Revit to maintain connectivity of the elements. In this case, worksharing display shows that in addition to the element that was directly modified by the user, all the connected elements indirectly modified as a result of the computed change are checked out as well.
Revit 2021 MEP Worksharing
What does this have to do with opening a model?
Imagine that you have receptacles hosted on the walls of an architectural model, and these receptacles are connected with wires to represent the circuiting. You receive word from the architect that some spaces have been modified, so you click Reload Latest. As a result, the wall (indicated in the example shown below) updates in location, the receptacle adjusts in position, and the connected wires are checked out as a result of this computed change. Assume further that you have not yet saved these changes to central, and your colleagues are trying to open the model. Revit will attempt to modify the wires again, resulting in the message that they can’t modify the elements during the model opening process.
As more users are adopting worksharing and linking directly to BIM 360 Docs hosted models, this scenario has been playing out more frequently, leading to user confusion because users didn’t realize what was checked out.
The keen observer would notice that the receptacle on the modified wall was NOT checked out. This is another part of the problem in that there was inconsistency in this behavior across element types. By ensuring that Revit only checks out user-initiated changes, and not the elements affected by computed changes, we have increased the consistency of the experience within Revit, in addition to removing the problems that can prevent a user from opening the model, as well as those that could lead to circular chains of synchronization conflict.
Synchronizing Results
There is a third type of issue that we have addressed that was resulting in scenarios where there were strange results after synchronizing, primarily affecting piping networks, but theoretically possible with conduit, duct, and cable tray as well.
In the image below, a single continuous pipe segment is highlighted between points A and B. However, there are also pipe segments between AC, CD, and BD, in addition to the pair of flanges at C and the weld at D. As a result, elements overlap in a somewhat illogical way that were not modeled directly.
In this scenario, the root cause was a combination of the computed change above, as well as the functionality that when an in-line component was deleted, one of the pipe elements would be deleted, and the other modified to fill the gap left by the deleted valve and deleted pipe segment. The problem was that neither the deleted nor the modified element were checked out, and thus, other users could potentially make conflicting changes. Subsequently, when changes were merged through synchronization with central, the results could be quite strange, and not readily apparent.
Legacy BehaviorNew Behavior
As a result, we have disabled the auto-healing functionality on piping to ensure that there are consistent and predictable results when multiple users collaborate through various modeling, coordinating, spooling, and other such activities in workshared models.
In order to get broader feedback from users, and alleviate some of the immediate known challenges, we wanted to release the improvements that are in place.
We also believe that it is relatively simple/straight forward to use the Trim command to close the gap left by a deleted element as a new workflow. We also think there are bigger and more challenging problems to solve with piping elements, rather than focus our efforts at this time on the auto-heal behavior, but we welcome your feedback. Let us know by submitting your feedback on the Revit Ideas site.
We hope these improvements enable you to work more effectively with various colleagues and stakeholders in Revit’s unique worksharing environment. Refer to the Revit Roadmap site for further updates.